Though i was in idea to prepare traditional christmas plum cake, my Gemini mind as usual took a left turn and here you see is Christmas pudding. This is such a easy recipe and the mixing part takes less than 15 minutes. you can even prepare this pudding without soaking the dry fruits in rum or brandy.

christmas pudding

You know that the traditional pudding calls for steaming, i did not have enough patience to steam. it was  impossible for me to steam for 3 or 5 hours by constantly checking! easier way is to bake them for an hour and half. i made this pudding in two batches, one for steaming and the other for baking. thats when i discovered baking takes less time and effort.

christmas pudding

serves: 6
baking time: 90 minutes
preparation time: less than 20 minutes
200 gms = 1 cup
recipe adapted from here.

Ingredients:

To Prepare fruit mix:

Candied peels mix - 100 gms
Candied peel of a citrus fruit - 50 gms
Dried Fig - 7
Dry grapes / kishmish - 50 gms
Dates - 7
Apricots - 5
Dry Black grapes / Sultana's - 50 gms
Glazed cherries - 50 gms
Tutti fruitti - 1/4 cup
Zest of 1 orange- 1 tbsp
Orange juice - 1/2 cup

Method:

Finely chop the candied peels into small chunks. chop all the other dry fruits, fig, kishmish, dates, apricots, sultana's, cherries and mix with the tutti fruitti and the zest of orange in a pan.

Mix orange juice with the dried fruits and place the pan in medium flame. keep stirring till the orange juice is completely absorbed. it may take uto 3-5 minutes. remove the pan from flame.

If you wish add 40 ml. of  Rum or Brandy, when the mix gets cooled down.

Ingredients for Pudding:

 Fruit mix - 400 gms / 2 cup's
 All purpose flour / Maida  - 200 gms / 1 cup
 Baking soda - 1 tsp
 Baking powder - 1 tsp
 Cinnamon powder - 1/2 tsp
 Nutmeg powder - a small pinch
 Dry Ginger powder - 1 tsp
 Brown sugar - 100 gms / 1/2 cup
 Butter - 100 gms
 Eggs - 2 small

Method:

Brush some melted butter in small aluminum bowl's in which the pudding is to be baked. line the bottom of the bowl's with butter paper and set aside.

Pre-heat the oven at 180C / 350F for about 10 mins.

Sieve the all purpose flour with baking soda, baking powder, cinnamon powder, nutmeg and dry ginger powder. sieve atleast twice so that all get mixed up evenly.

In a small pan, melt the brown sugar with a tbsp of water. need not caramelise. just the sugar crystals has to get dissolved. in another seperate pan, melt the butter and set aside.

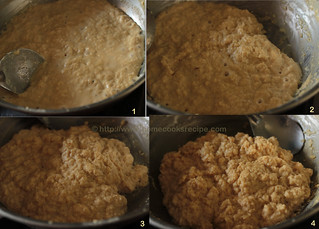
In a wide bowl, put the 2 cup's of fruit mix and add flour to it. mix well with a wooden spoon or spatula, next add dissolved brown sugar and melted butter. mix well. finally break in egg's one at a time and mix well. 

Once the pudding mix is ready, divide and transfer to the small individual greased aluminium bowls. fill the bowl's 3/4th so that there is enough space for the pudding to rise while baking.

Finally grease a aluminum foil sheet with butter and place the greased side facing the pudding and cover the pudding bowls. With a thread tie over the neck of the bowl so that the aluminium foil is tightly tied to the neck of the bowl.

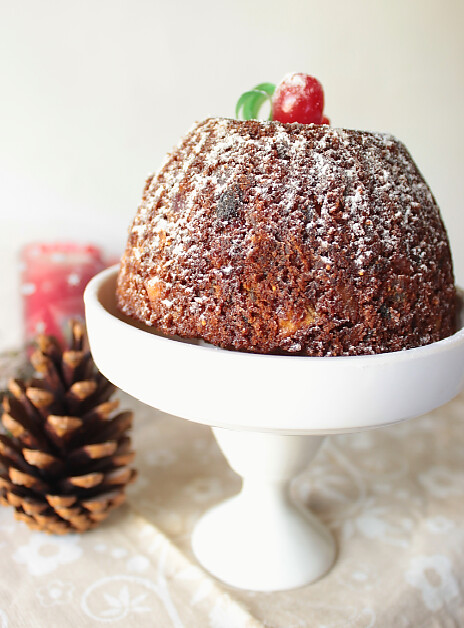
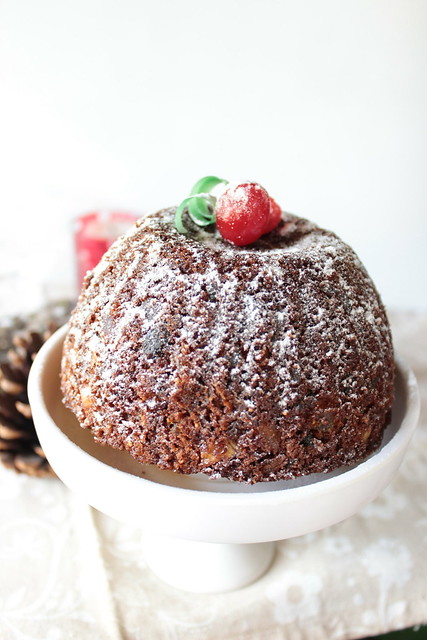
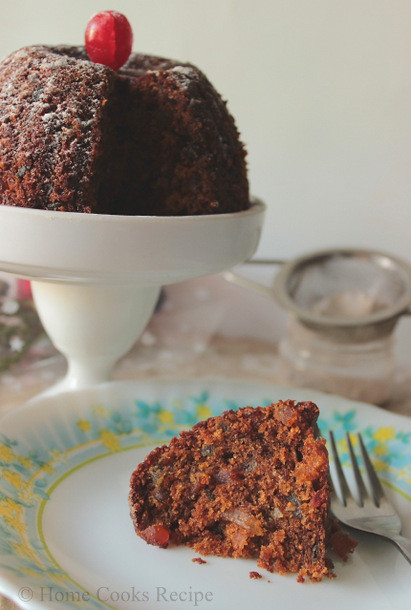
Now bake the pudding at 180C for about 90 minutes, till a tooth pick inserted to the centre of the pudding comes out clean. if you are placing a large bowl of pudding, time may differ.

christmas pudding

In case if you are interested in steaming the pudding the traditional way, you can steam in a large pan of boiling water or in a wide pressure cooker filled with boiling water. place a small bowl turned upside down in the pressure cooker and pour 6 cup's of boiling water and place the pudding bowl(with aluminium foil tied) carefully over the bowl turned upside down. close the pressure cooker and do not put the weight/whistle. steam the pudding for about 3-4 hours in medium flame. every 1 hour check the water level and keep adding boiling water so that half of the pudding bowl is in boiling water always. steam till the pudding is done. check by inserting a toothpick to the centre of the pudding comes out clean.

Notes:

Once the pudding is baked, remove the pudding from oven and place on a wet towel, so that it easily comes out of the bowl when pudding get cooled down.

This pudding keeps well for a week after baking, if you want to mature the pudding, keep adding 1/2 tsp of rum or brandy over the pudding  once in 2 days.

This pudding is served along with custard, so you can try serving that way too.

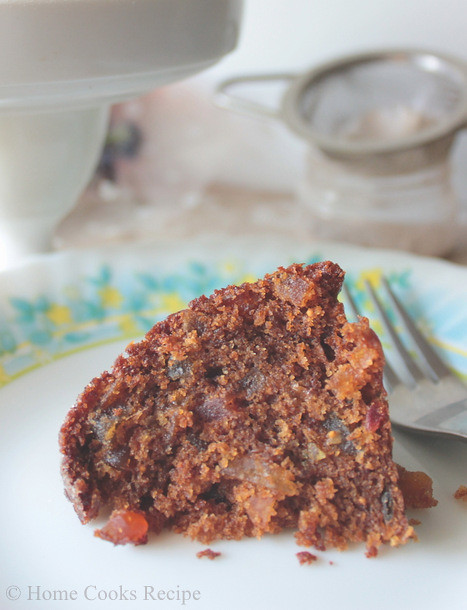
This is such a easy pudding recipe and it turns out perfect. just follow the ingredients. the ratio is 2 cups of dry fruits : 1 cup flour : 1/2 cup sugar : 1/2 cup butter.

 
slice of christmas pudding


First i need to scream and tell you, that i am doing a work continously, it is - i am blogging here for the past five years!! Sounds Great right? Things that keeps me hooked in blogging is, mails from my readers who write up after trying recipes from here. it's like drinking some enegy drink when you read your readers mail. i wanted to share a comment which i could never forget and makes me smile, whenever i think about it.

For curd Rice - " hey lavi...m pregnant n was tempting 2 hve curd rice...i made ur recipe its delicious...........thnk you....... m happieeeeeeeee n my stomch tooooo"
Thank You Anonymous!!!! 


Did i tell you, that i was contacted by my neighbour to bake cupcakes for their get together party. and i delivered about 30 of these cupcakes. the host of the party said, everyone liked & told me, many enquired, whether i would take orders from them too!! i also made kaju katli's for my other neighbour and Eggless dates cake for a birthday party! seems everyone liked my bakes and it makes me happy!! 


so this cupcake recipe is tried by me for more than 5 times in a row for this year alone!


makes - 18 muffins
baking time - 20 mins

Ingredients:

1 and 1/4 cup of All purpose flour / maida
1 tsp baking soda
2 tsp baking powder
a tiny pinch of salt
2 Egg's
2 tbsp of milk
1/2 cup of sugar (powdered)
1/2 cup of butter (Butter at room temperature)
1/4 cup of cocoa powder
1/3 cup chocolate chips

for whipped cream frosting:

Whipped cream powder - 50 gm / 1 pack (i used blue bird whipped cream)
Cold ice water - 90 ml

Method:

Pre-heat the oven/OTG to 200C. Line your muffin tray with cup cake liners.

Sieve the flour,baking soda, baking powder, salt and cocoa powder together for atleast two times so that the flour, mixes well with b.soda and b.powder.

In a large glass bowl, beat together the butter and powdered sugar until pale and fluffy. i used my electric mixer and it always takes about 2-3 minutes at medium speed to cream the butter pale and fluffy. Break in the egg's one by one and beating well after adding each egg.

Start adding flour to the bowl in three intervals and use your wooden spoon or spatula to fold in the flour. add milk and chocolate chips and mix everything together. Divide the batter to the lined muffin tray.

Bake for about 20 minutes, until a toothpick inserted to the centre of the muffin comes out clean. once the muffins are done, cool them for about 10 minutes.

To make the whipped cream frosting, In a seperate mixing bowl, beat together the whipped cream powder and the ice cold water(90ml.) for about 3 minutes in high speed with your electric mixer. once the cream is whipped, put the whipped cream in freezer for about 10 minutes before frosting the muffins.

Just spread a spoon of frosting over each muffins sprinkle few chocolate chips on top. it is better to to do frosting just before serving, as the frosting falls/melts down in few minutes for indian climate. or after frosting, refrigerate the muffins till you serve.


Thanks to all by blogger friends, my blog readers and commenters for all your support and love!!!


I love to cook drumstick as often as possible. Wherever i stayed, the home had an drumstick tree. be it my grandparents place or at our village home or at my mom's place or at my boarding hostel and even in the apartment i am in now. It is said that, the drumsticks taste better, when the tree gets good groundwater. unfortunately drumsticks in our apartment do not taste good. we mostly buy out. I like drumstick leaves dal and drumstick sambhar much than this curry! 


Very recently, i learned to make authentic vathakuzhambu, and this murungakkai kuzhambu recipe is the same recipe of vathakuzhambu. i have tried this recipe quite a lot of times and it always came out so good. absolutely this is a finger-licking curry. If you miss your home, then you must definitely try this curry. 
                        

serves - 2
Ingredients:

Drumstick - 1
Shallots / small onions - 8 or 12
Garlic - 8 cloves
Sambhar powder - 2 tsp's
Tamarind - a small lemon sized
Jaggery - a very tiny bit (optional)
Salt to taste

For tempering:

Sesame oil - 2 tbsp
Mustard - 1/4 tsp
Fenugreek seeds - 1/4 tsp
Curry leaves - 1 sprig
Small dry red chilly - 2
Tuvar dal - 1/2 tsp
Hing - 1 tsp

Method:

Chop the drumsticks into finger size pieces. cook the drumsticks in a cup of water for about 5-7 minutes. it always takes 10-15 mins to cook drumsticks. you can also microwave on very high for about 10 mins.

While the drumsticks get cooked, peel the shallots and garlic and set aside. Heat 1/4 cup of water in small cup and soak the tamarind in hot water for about 10 mins at least. then squeeze the tamarind out and set the the thick tamarind extract aside.

Heat a thick bottomed pan, add sesame oil, add mustard and let it pop, then add fenugreek, tuvar dal, dry red chilly, hing and curry leaves, saute them all for a second.

Now add in the garlic and shallots, fry them all, till they are almost cooked. it may take at least 2-3 minutes. once the shallots are cooked, add in the sambhar powder and roast the powder for at least a minute, till the raw smell goes off. then add the tamarind extract to the pan and stir well. finally add the cooked drumstick along with the water cooked and mix well. add salt to taste. add 1/4 cup of water and mix well. if preferred add a tiny bit of jaggery and mix.

Let the curry boil for about 5 minutes, till it thickens. put the curry in slow flame with the pan open, let the curry boil for another 3- 5 minutes.  remove the curry from flame and transfer to serving bowl.

Serve hot with Rice or Idly or Dosa.

Today's meal- murungakkai puli kuzhambu, pattani sundal and garlic rasam

Notes:

The trick in getting the perfect tasty kuzhambu is in roasting the sambhar powder for a minute.
Adding 2 or 3 tsp's of sambhar powder makes the curry spicy and also thick.

and you know what, i finally managed to differentiate between kaara kuzhambu and puli kuzhambu and vatha kuzhambu!!


I wanted to try this curry, when i made the sri lankan roasted curry powder last year, but it took a year and finally i cooked this super pumpkin curry yesterday. somehow we loved the curry powder and the flavor it imparts on the curry. You can never find a vegetarian curry so flavorful and spicy other than this. that's my opinion, it may differ with you! 


Hubby liked the masala and curry, as its very spicy and rich. we both are not huge fans of pumpkin. But any ways if you are looking for a spicy pumpkin curry, this should be your choice! or try substituting with potatoes or brinjals which will match with the curry.


This pumpkin curry is known as wattakka kalu pol in sri lanka. its one of the favorite vegetarian curries among the locals. You can refer Master Chef participant Dani's pumpkin curry video here. You need to have the roasted curry powder to prepare this curry, it can just be prepared in 15 mins. and it keeps well for 3 months.

Serves : 2

Ingredients:

Yellow Pumpkin - 1 cup / 250 gms (Diced)
Red onion - 1
Green chilly - 2 (finely chopped)
Garlic - 6 cloves
Ginger - 2' inch size
Coconut milk - 1/2 cup ( first pressed coconut milk, if using canned coconut milk refer notes)
Roasted curry powder - 2 tsp
Chilly powder - 1/4 tsp
Cumin powder - 1/2 tsp
Corriander powder - 1 tsp
Coconut oil - 2 tsbp
Bay leaf - 1
Curry leaves - 1 sprig

To roast and grind

Dry coconut - 1 tbsp
Raw rice / Basmati rice - 1 tbsp

Method:

First dice the pumpkin's, wash them and let it boil in a cup of water till they are well cooked.

Roast the dry coconut and raw rice separately till they are well roasted and grind them together. this is used to thicken the curry.

In a thick bottomed pan, add coconut oil, add garlic and ginger fry them well. add curry leaves, bay leaf and finely chopped green chilies  next add the chopped onion and saute till it turns translucent. then add cumin and corriander powder. mix them all with the onions.

Add the cooked pumpkin to the pan and  add the roasted curry powder and chilly powder and salt to taste. Mix it all with the pumpkin. add in the coconut milk and give a stir.

Once the curry starts to boil, reduce the flame to medium and add the roasted and grounded dry coconut + raw rice powder(1 tbsp) to the curry. mix well. when the curry starts thickening, reduce the flame to low. You can remove the curry when the curry attains your required consistency.

Notes:

If you prefer the curry to be very spicy and hot, add a red chilly  and one green chilly. i bet it's super hot!

If using canned coconut milk, dilute 1/4 cup of milk with water and use it.

This curry goes well with hot steamed rice, dosa's and appam.


I hate variety rice to the core, right from my childhood. If my mom packs me any variety rice other than tomato rice and curd rice for lunch, I come home in the evening without even tasting a spoon of it. I am so much adamant on this. Even now, i hate tamarind rice, lemon rice and this coconut rice to the core! Then if you ask me, why i am posting the dish i hate the most, then its because now i started to feel my mother feelings, when my son come home without eating few food which he do not like. and the next reason is my mom makes this coconut rice interesting by adding appalam to it. so i just want to share it here, So you could try and make the kids eat coconut rice! 


We call it as appala poo sadam, may be because it has appalam and thengaai poo in it. You can prepare this in a jiffy, if you have grated coconut and appalams ready in hand. You should serve this appala poo sadam / coconut rice with liquid coconut chutney and also with potato roast or potato chips. Serving this plain will not be so good and may develop haters like me!


I served my appala poo sadam with baby potato roast. It was such a good combo. 
Finally the pictures are shot with my new Canon 600d. starting auspiciously with the coconut!! I made a mistake with white balance and the pics started to look pale. I am still learning the new camera, hope i learn quick!! over to recipe now.

Ingredients:

Cooked rice - 2 cup's
Fresh Grated coconut - 3/4 cup
Appalam - 4 (already fried / ready to eat)
Sesame oil - 1 tsp

For tempering:

Coconut oil / Sesame oil - 1 tbsp
Mustard - 1 tsp
Peanuts - 2 tsp's
Chana dal - 1 tsp
Urad dal - 2 tsp's
Curry leaves - 1 sprig
Green chilli - 2
Dry Red chilli - 1

Method:

Cook the rice, with right amount of water(rice:water should be 1:2) in pressure cooker for about 2 or 3 whistle count. make sure rice do not get mashy, Rice should be grains apart. you may also use basmati rice. Once the rice is cooked, spread the rice in wide bowl or plate, drizzle a tsp of coconut or sesame oil over the rice, mix with a fork and leave the rice to get cool.
Heat 1 tbsp of coconut oil in a pan, add mustard and let it pop, then add chana dal, urad dal, peanuts green & dry red chilli and roast them till they become golden in color. add curry leaves and fry it too. then add the grated coconut's and fry in low flame for about a minute mixing with the other tempering ingredients. Now add salt to taste.
Crush the appalam with your hands and just mix up with the other ingredients in the pan, mix it all up. switch off the flame. Then add rice to the pan, if possible you can toss the pan or slowly mix the rice with the tempering without breaking the rice. Now appala poo sadam is ready to serve. 
Serve with little watery coconut chutney or with potato chips or potato roast. 
 Note:

Only when the rice is served immediately the appalam will remain crisp. if served later, appalam turns soft, but no matter, still you can enjoy its taste.

Add Salt, keeping in mind that of the salt in appalam.


Choosing ready made gulab jamun mix and making jamuns are easy now a days. but making gulab jamun from scratch gives great satisfaction and we know how pure and good it is, when we make at home. also the texture and taste should beg with the popular ready made gulab jamun mixes. i have decided early, that this diwali i should be preparing khoya jamun and also i know i will be following cilantro's recipe! it turned out perfect and its a flawless recipe, so do try this khoya gulab jamun and enjoy this diwali! friends and family tasted the jamuns and it won everyone's heart! those who tasted, asked the recipe for it. so it proves!


When you mix the khoya and maida together, your gulab jamun mix gets ready! so why not you try next time?

My son got overjoyed on seeing the bowl of jamuns, when he returned from school, he also helped me in clicking pictures!


makes - 30 jamuns approx
Preparation time - less than 20 minutes.
Recipe from: cilantro
check out how i made khoya a day before preparing jamuns.

Ingredients:

Maida / All purpose flour - 100 gms
Baking soda - 1/8 tsp(a small pinch)
Oil - 200 ml 

To make sugar syrup:

Sugar - 200gms
Water - 1 cup
Cardamon - 2
Saffron - few strands

Method:

Sieve the Maida and baking soda together twice and transfer it to a wide bowl.

Homemade khoya

check how i made khoya with 1 and half litres milk. you will get khoya to make more than 40 - 50 gulab jamuns with it.

Mix the khoya little by little to the flour by hand, first it will look like bread crumbs and then you will feel like making chapathi dough, sprinkle a tsp of water and combine all together and form a smooth dough. add a tsp of oil to make the dough smooth and non-sticky to your hands. Pinch a small piece of dough and shape them into a small lemon sized one. make sure, you do not apply pressure while rolling with your hands. also avoid big cracks in the ball by rolling till its a smooth ball.


When the dough is getting ready, heat oil in one pan and prepare sugar syrup in another pan. 

To make sugar syrup, take 200 gms of sugar in a pan and add a cup of water about 200 ml. stir to dissolve the sugar. switch off the flame when the sugar syrup reaches half a string consistency. add crushed cardamom and saffron strands to the syrup and give a stir.

When the oil gets hot, low the flame for about 2 minutes and then start dropping the jamun ball's to the oil. slowly give a stir and wait till the balls reach golden color. it takes about a minute in low flame. make sure you cook jamuns in low flame.


Once the jamuns are fried till they turn golden color, remove the balls and add to the hot sugar syrup. pour a ladle of syrup over the jamun and thus giving hot sugar syrup bath, it will turn soft, sweet and fluffy.

This way remove all the jamun to the sugar syrup and let the jamun rest in sugar syrup for about 15 minutes before you start to serve hot.


Tip's:

If the oil is too hot, jamun's break in oil. also use sufficient oil to fry so that the jamun balls immerse in oil while getting fried.

If buying khoya from store, grate the khoya and start mixing with the flour, so that no khoya lumps are formed.


Homemade khoya

I longed for it for nearly four years, i prayed for it to come to my hands, i was torturing my friends about how i badly wanted it. whenever i am alone at home, i googled and read about it. whenever i saw it on some strangers hand, my eyes looked at it curiously. i hear you saying enough..okay, My Hubby and my dear Son gifted (fulfilled) me the Canon Rebel T3i dslr camera. oh, you still have to wait for me to explore my new love and then we shall bring you the magic here soon. 

homemade mawa

Khoya is unsweetened khova / paal khova. it is also known as Mawa. i wanted to prepare gulab jamun from scratch for this diwali, as my son is going crazy over gulab jamun. so today i prepared khoya spending nearly 2 hours in the kitchen. Tomorrow i will post how i made gulab jamun with khoya.

Khoya is just simmering the milk for hours, with stirring occasionally in the start and constant stirring towards end. i guess the recipe for khoya is over in the line before!

Total cooking time: 2 hours
yields 1 cup of khoya(200 gms)

Ingredients:

Full fat milk - 1 and half ltrs.

Method:

In a wide thick bottomed pan, pour the milk and let it boil. then simmer it for about 1 hour so that the milk gets thick and reduced into half. then bring the flame back on high and keep stirring every two minutes, so that the khoya do not stick to the bottom of the pan. even if it sticks, do not scrap hardly as it may ruin the beautiful khoya.

khoya1


When you see the the khoya (some where looking like thick curdled milk) turn the flame to low and start stirring.  nearly towards the 2nd hour from start, the khoya gets thickening. keep stirring softly, so that it do not stick to the bottom.

khoya2


Sometimes, the khoya may not thicken up, add 1 or 2 tsp of milk powder, for the khoya to get thick. the khoya should be soft and spongy at the end.

Notes:

Use a wide and thick bottomed pan, so that the milk do not overflow.

if you want to have sweet khova, add 1/2 cup sugar when the milk had reduced to about half a litre. the other procedures are all same.

Sometimes, the khoya may not thicken up, add 1 or 2 tsp of milk powder, for the khoya to get thick. the khoya should be soft and spongy at the end.

Writing up the first sentence or the first paragraph here always takes time for me. that too after a break, it still gets worse. what to write here, whether to write about my son getting hurt on his tooth and kept me busy or to tell you all, how i have grown lazy in the past days! Yes my kid got hurt on his tooth  and lips while he was playing running race downstairs. though now it seams to be a small wound, the boy could not chew or use his teeth for a week. so it was just baby food time! feeding spoon by spoon of liquids every hour. oh..it was a big relief for me, when he started to take food back! now all is well with him. this reminds me how i got my lips hurt in my childhood. It should have bothered my mom just as i bothered! so finally after few backspace and delete key efforts from me, here you finish reading my first paragraph of this post!


Mutta curry, i make this curry, when me or my hubby get cold. its because lots of pepper goes into this curry. this is a simple yet delicious dry egg curry.  If you want to have a vegetarian version of this dish,  you can make it with cauliflower or baby potatoes or with paneer. i even want to try this masala with cauliflower, i will try and post it soon here!


Ingredients:

Egg - 3
Oil - 1 tbsp + 1 tbsp
Mustard - 1/4 tsp
Curry leaves - 1 sprig
Turmeric powder - a pinch
Salt to taste 
Grated coconut and corriander leaves to garnish

To grind:

Shallots / small onions - 5
Tomato - Half
Pepper - 10
Grated coconut - 1/4 cup
Corriander leaves - 2 tbsp (chopped)

Method:

Boil the egg and remove its shell. slice them into half and keep aside.

Heat a small pan, add 1 tbsp of oil, add the small onions and fry till it turns translucent. add the tomatoes too and saute it for a minute. remove the onions and tomatoes to you mixer jar, add grated coconut, corriander leaves and pepper. add just 1 or 2 spoons of water and grind into a smooth and thick paste. 

Heat 1 tbsp oil in a pan, add mustard and let it pop, then add curry leaves and the gounded masala. saute the masala in oil for a minute in medium flame. add the egg's and wrap them with masala's. let it remain in medium flame for a minute and remove to the serving bowl. 

Garnish with chopped corriander leaves and grated coconut if you wish!

Serve with hot rice and rasam. it makes a delicious combo!


Whenever my sister anu says, she fed her kid paruppu sadam, i used to think it as rice mixed with dal and ghee. When Sharmi blogged arisi paruppu sadam, i liked it much and was telling about it to my sis. then she told thats what she was feeding her kid often. she told the recipe in a flow. i straight went into the kitchen and made in minutes. Now i have prepared this several times. this is such a easy, pretty fast meal, which you can serve your kids wholeheartedly with lots of ghee.


I prefer to serve this sadam with egg poriyal or appalam. even potato roast will make a nice combination to this rice.


I tried out making video, it was just a trial, please excuse this very very amateur video, as its shot from one hand as the other hand was cooking! sure will get a tripod soon and make better videos in future. 


mute your speaker, as it has my fav song running on background! 

Ingredients:

Rice - 200 gms (1 cup)
Tuvar dal - 40 gms (1/4 cup)
Onion - 1
Tomatoes - 2 medium sized
Green chilly - 1
Garlic - 4 cloves (Crushed)
Turmeric powder - a pinch
Sambhar powder - 1/4 tsp (optional)
Corriander leaves - to garnish
Ghee - 1/2 tsp for serving 

For tempering:

Oil / Ghee - 2 tbsp
Mustard - 1/2 tsp
Split urad dal - 1/2 tsp
Curry leaves - 1 sprig
Asafoetida powder - 1/4 tsp

Method:

Soak the rice and dal together in water for at least 30 minutes. drain the water and set the rice, dal aside. cut the onions and tomatoes finely. crush the garlic and  slit the green chilly vertically. 

Heat a wide bottomed Pressure cooker, add oil or ghee, once it gets hot, start the tempering, add mustard and let it pop. then add split urad dal in medium flame, else it may get browned soon. add crushed garlic, green chilly, asafoetida powder and curry leaves.

Now add the onions and saute till it turns translucent. then add the chopped tomatoes and saute well, till they get soft and mashy. add 1/4 tsp of turmeric powder and 1/4 tsp of sambhar powder. mix all together.

Now add the soaked and drained rice and dal to the cooker, mix well with the onions. add 3 cups of water, and salt to taste. close the pressure cooker with its lid and put on the weight.

Let the pressure cooker whistle for at least 4 times in medium flame. switch off the flame. let the steam escape before opening the lid. Serve hot with a tsp of ghee and appalam or with any side dishes.

arisi paruppu sadam served with brinjal podi varuval and karandi omelette

Notes:

You can omit mustard and urad dal and add cinnamon , bayleaf and cloves as tempering. it will be of a different taste. This is ideal for lunch boxes. so on a busy weekday, you can make this in minutes and pack for your kids.

First i hate to name this has Appam. we call it as ஆப்பம்(aappam), in english it may be read / means burp. so without heart i call it appam now! My great grand mom used to make appam with coconut toddy (kallu) for us. the flavor and taste of those appam is just unbeatable. forget the drowsiness after eating appam. and just for the drowsiness, we kids won't be fed appam on school days!! 

On our recent trip to kerala, i had appam for break-fast and also for dinner all the 2 days we stayed. i like these soft white bowl shaped appam so much! what i have made here is, appam with yeast. yeast is used as a substitute for toddy. usually fresh toddy should be added to the appam batter, which naturally ferments. it should be allowed to ferment for at least 8 hrs. In my experience, even if you are preparing appam without yeast, the batter should be allowed to ferment for above 16 hrs. only then you can get perfect appam's.


How to eat the appam is, sprinkle 2 or 3 tsp's of sugar in the centre of the appam and pour coconut milk/ just plain milk, let the appam soak for few seconds and eat! It will be a divine break-fast!

appam served with veg stew and milk 


Appam with Yeast Recipe

Prep Time30 mins 
Cooking Time: 05 mins  
Serves20
Recipe CuisineIndian
Recipe TypeBreakfast

Ingredients:

  • Raw rice - 2 cup's (400gms)
  • Par boiled rice / Idly rice - 2 cup's (400 gms)
  • Urad dal - 1/2 cup (50 gms)
  • Fenugreek - 1/4 tsp
  • Luke warm water - 1/4 cup
  • Active dry yeast - 1 tsp
  • Sugar - 1 tsp
  • Rock salt / kal uppu - 1 tsp


Method:

Soak the raw rice, par boiled rice, urad dal and fenugreek in water for about 4 hours. Grind them into a very smooth and thin batter(not very thin actually). the grinding time may take from 45 minutes to 1 hour when grinded in grinder. Once the grinded appam batter is ready, transfer the batter to a clean vessel and close it with its lid and let the batter to ferment for overnight or 12 hours. 


After fermentation, its time to add yeast and let it ferment for the second time. so prepare for this second fermentation, ahead of 2 hrs of preparing appam. In a small mixing bowl, mix yeast, sugar, rock salt in Luke warm water and stir well with a spoon so that the yeast get's dissolved. close the mixing bowl with a plate and let it rest for about 10-15 minutes. this is to prove the yeast for its activeness. once the yeast mixture turns frothy, add it to the fermented appam batter and stir well. Now let the appam batter ferment for the second time for about 1 and half hrs to 2 hrs. once the batter ferments. its ready to make appam.

                  this pic is taken after first fermentation. it actually ferments more after adding yeast!


Mix little water, if the batter is too thick. heat a appa kadaai, i use my non-stick appam pan. smear the pan with a drop of oil. with a sliced onion, just spread the oil on sides of the pan(repeat this when preparing each and every appam). Pour 2 heaped ladle full of appam batter in the center of the appa kadaai / pan and swirl the kadaai / pan, this makes the batter spreading towards the sides of the pan. close the pan with its lid. let the appam get cooked in high flame for just a minute.

if you want the centre of the appam to be thick(like in the above pics) and the sides thinner, you should add another ladle of batter, this makes the excess batter get into the center. but you have to put the flame in medium and close the appam pan. it may take more than a minute for the appam to get cooked. you can test, by touching the center of the appam. if it sticks, its not cooked! then wait for some more time.

The left over appam batter can be put back in fridge, actually it ferments again and that gives still good appam 's in the next batch. do not forget to finish up the batter in 2 day's. its not like our idly batter, which keeps good for 5-7 day's.

Notes:

If you want to prepare appam without yeast, just let the appam batter ferment for about 16 hours. take half a cup of water, add 1 tsp sugar, 1 tsp rock salt and 1/4 tsp of cooking soda and mix well. now add the mixed water to the fermented batter and mix well. let the batter rest for 30 minutes before you start making appam.

You can also add Instant yeast and add it to the batter, without proving the yeast. if using coconut toddy, add 1 cup of toddy, for this recipe.

This is the recent poriyal craze going on at home. just love this kathirikai podi curry, as it goes well with rasam or sambhar or any variety rice. its simple and easy to prepare.

                                    Kathirikai podi varuval with arisi paruppu sadham


You can prepare it in three different ways. yes i have tried three different ways just in the past one week! i will share two ways here, one is with less oil and the other is sinful varuval kind. though it can be prepared in three ways, basic podi is same, and it differs in either sauting or frying or steaming the brinjal's.

Ingredients for podi: 

                            got this moram after seeing it on raks kitchen. now i love to use it!

4 or 5 dry red chilli
1 tbsp chana dal
1 tsp dhania
1 tbsp peanuts
1 tbsp sesame seeds
1 tbsp grated fresh coconut or kopparai(dry coconut)

Dry roast the above ingredients one by one in medium flame till they turn into golden color. once roasted, cool them down and grind into a coarse powder.


If you have added dry coconut, you can store the podi in fridge and use it up later. you can also prepare vazhakkai podi varuval. so prepare the podi  in excess and store in an air tight container, which could be good for at least a week.

Kathrikai podi poriyal: ( with just 1 tsp oil )


Purple brinjal - 10
Oil - 1 tsp
Curry leaves - 1 sprig
Tamarind - a small lemon size
Podi - 3 tbsp
Turmeric - 1 tsp
salt to taste

Method:

Trim the tails of brinjal and cut them lengthwise. soak the tamarind in 1/2 a cup of water and squeeze out the pulp. heat a pan, add the tamarind water and brinjal's. let the brinjal get fully cooked in it and the water should be absorbed by the brinjals. at this stage, add salt to taste, turmeric powder and the podi. mix up all together. add a tsp of oil and mix them all. leave the brinjal's  in slow flame for about 2-3 mins. add curry leaves & remove from flame. serve with hot rice. Tastes best when served with mor kuzhambu or rasam.

Kathrikai podi varuval: (with 4 tbsp's of oil)


Purple brinjal - 10
Oil - 3 - 4 tbsp
Curry leaves - 1 sprig
Podi - 3  tbsp
Turmeric - 1 tsp
Chilly powder - 1 tsp
salt to taste


Method:

Trim the tails of brinjal and cut them lengthwise. Heat oil in a pan, add the brinjal's and fry them till they are almost cooked(3 - 4 minutes). add salt to taste, turmeric, podi and chilly powder. mix up well. let the brinjal's get wrapped up well with the podi. Let the brinjal fully cooked in low flame for about 2 or 3 minutes. add the curry leaves and remove from flame. serve hot.

I served with arisi paruppu sadham, which was a delicious combo!

I liked the version with less oil, as its guilt free. but you all know, which one will taste good. i was talking about the third version of steaming isn't it?. you can refer bharathy's spicy chilly.


Me and hubby love pesarattu. whenever we eat out at a andhra hotel, we order this. I love to prepare pesarattu on weekends as it involves less job and extra credits goes for this healthy break-fast. when you have little of last batch of the dosa batter, mix it along with pesarattu batter. that yields good dosa's.


I used to add raw rice for making the batter and have made thick pesarattu like our adai before. somehow, we liked only the thin one's. so i started to follow this simple recipe.


I just love to eat these pesarattu without any side-dishes. the onions and green chilli on every bite will simply be good. Pesarattu is normally served with upma. It can also be served with simple coconut chutney and sambhar. 


Pesarattu

yields- 10 thin pesarattu
soaking time - overnight or 3 hrs
preparation time - less than 15 minutes


Ingredients:
  • Whole moong dal - 1 cup / 200gms (soaked in water overnight or 3 - 4 hrs)
  • Green chilli - 2
  • Cumin - 2 tsp
  • Ginger - 1' inch size
for topping:
  • Onion - 1 finely chopped or 10 small onions finely chopped.
  • Green chilli - 1 finely chopped
Method:
Wash and soak the whole moong dal in water for about 3 - 4 hrs or overnight. if soaked for overnight, it may also sprout and that makes the pesarattu more nutritious.
Grind the soaked moong dal along with green chilies, ginger, cumin, 1/4 cup of water & salt to taste into a smooth and fine batter.
Now the batter is ready to make pesarattu. yes you need not ferment! Heat a dosa tawa, take a ladle full of batter and make dosa's. if you prefer thin make thin dosa's.
Drizzle oil on sides, if you prefer toppings, add the finely chopped small onions and green chilli over the dosa and wait for a minute and flip the dosa, to let the other side of the dosa to get cooked. after half a minute remove the dosa to serve.
          Serve plain or with coconut chutney or sambhar.

Notes:

  1. As mentioned, you can mix this pesarattu batter along with left over dosa batter and make dosa's.
  2. If serving pesarattu for kids, make sure to reduce one green chilli, it will reduce spice.